Configure Low-Code Settings
EnableX Low code offers a suite of settings which are designed to grant you control over various aspects of your video application without the need for extensive coding.
To configure Low-Code settings, Follow these steps:
-
Navigate to Video section in the left menu pane and select Dashboard option from the drop-down.
-
Select the Low Code project for which you want to configure settings. This will take you to the Project Summary page.
-
Select Settings tab.
-
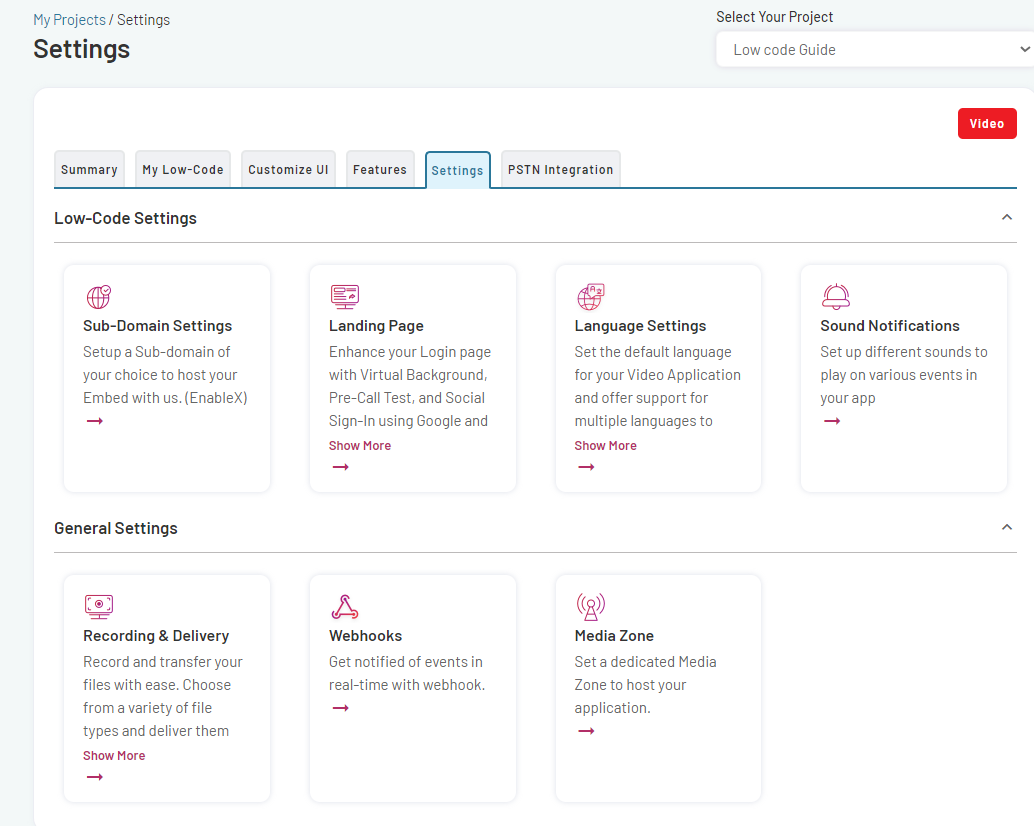
The Low Code Settings interface will open, presenting you with a suite of Low-Code Settings and General settings.
-
Low-Code Settings
- Sub-Domain settings
- Landing Page Settings
- Language Settings
- Sound Notification settings
-
General Settings
- Recording and Delivery
- Webhooks
- Media Zone
Configure Sub-domain Settings
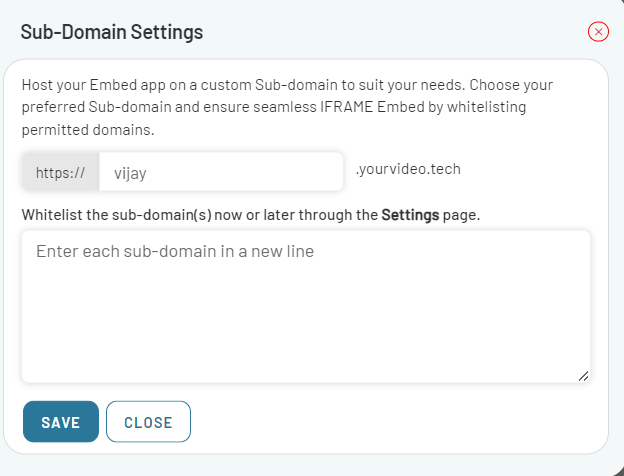
This setting allows you to update or change the subdomain of the URL where your video is hosted.
-
By modifying the subdomain, you can alter the web address used to access and view your video content.
-
Changing the subdomain can be beneficial for rebranding, organizing videos into different sections, or personalizing the URL to reflect your brand or purpose.
-
To customize the subdomain:
-
Click on SUB-DOMAIN SETTINGS tab.
-
Enter a name for the subdomain that you want to use for hosting the application.
-
-
To whitelist the Sub-Domain(s):
-
Add the name(s) of the subdomain(s) you want to allow, with each subdomain on a new line.
-
Click on SAVE button, once you have entered the desired subdomains.
-
The specified subdomains will now be whitelisted, and they are allowed to use the custom subdomain feature for hosting your Embed app.
-
Configure Landing Page Settings
You can enhance the functionality and user experience of your landing and login pages. Choose the features that align with your needs and preferences.
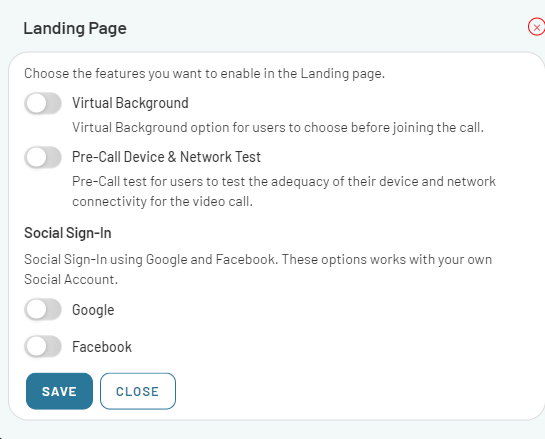
To enable or disable the features for the Landing page, you have the following choices:
Virtual Background
- Enable or disable the option for users to choose a virtual background before joining the call.
Pre-Call Device & Network Test
- Enable or disable the pre-call test for users to check their device and network connectivity before starting the video call.
Social Sign-In
-
Enable or disable the option for users to sign in using their Google or Facebook accounts. You can choose to enable Social Sign-In using Google, Facebook, or both, or disable it entirely.
-
Click on SAVE to ensure that the chosen features are enabled or disabled according to your preferences.
Configure Language Settings
The language settings allow you to choose the default language for your Video Application and enable multiple language options for your users.
There are two aspects you can manage:
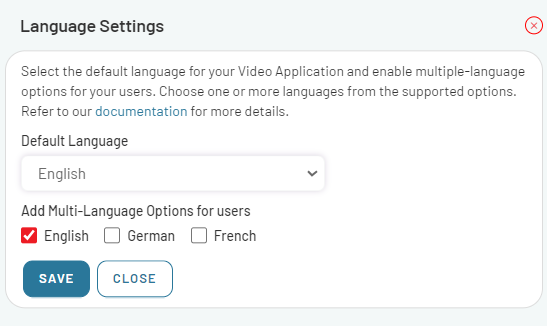
Default Language
- Choose the Default Language you want to set for your Video Application.
Multi-Language Options
- To add multi-language options, check the box next to each language you wish to include.
Note: If you want to allow your users to choose their language, check all the languages that you want to make available to them. Users will see Embed in the default language. However, an option to switch to other available languages is also provided.
-
Supported language options include:
- English
- German
- French
-
Click on SAVE button to ensure your Language selection.
Configure Sound Notification Settings
Different sounds can be played for different notification events in your application. The notification sounds can be applied to moderators and/or participants as needed. Notification sounds for events like starting or stopping a recording or when a new chat message is received can be applied to all the users (participants and moderators).
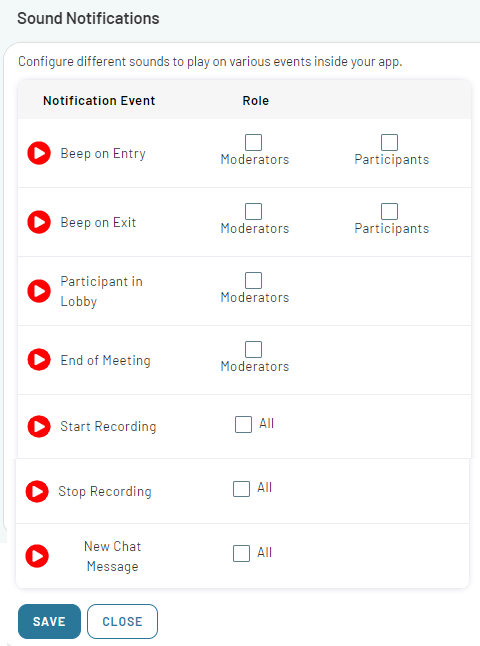
- Click on SAVE button to save your selections.
Configure Recording and Delivery Settings
You can set up an Archiving and Delivery service to capture and archive webinars and meeting room data including voice, video, captions/transcripts, and in-meeting chat messages, and make them available on a destination server, service, or platform of your choice.
- Navigate to the Recording & Delivery tab.
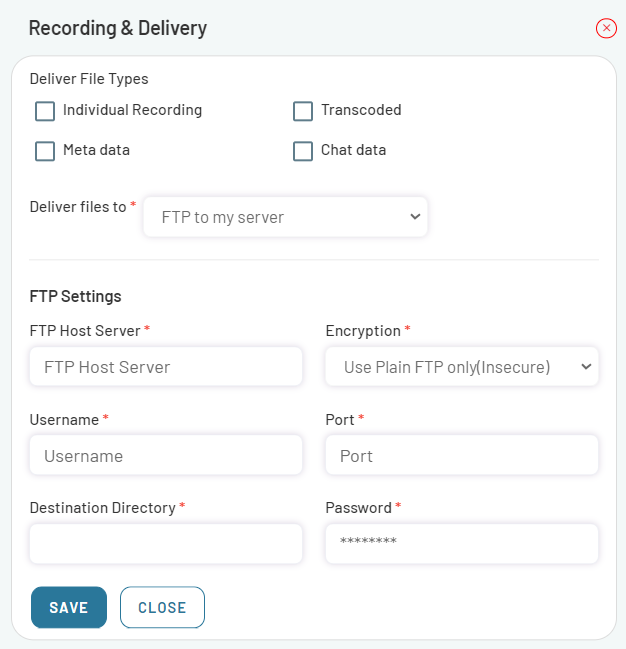
On the Recording & Delivery page, you have the option to choose the file types to deliver and specify the destination for the recorded files. To configure these settings:
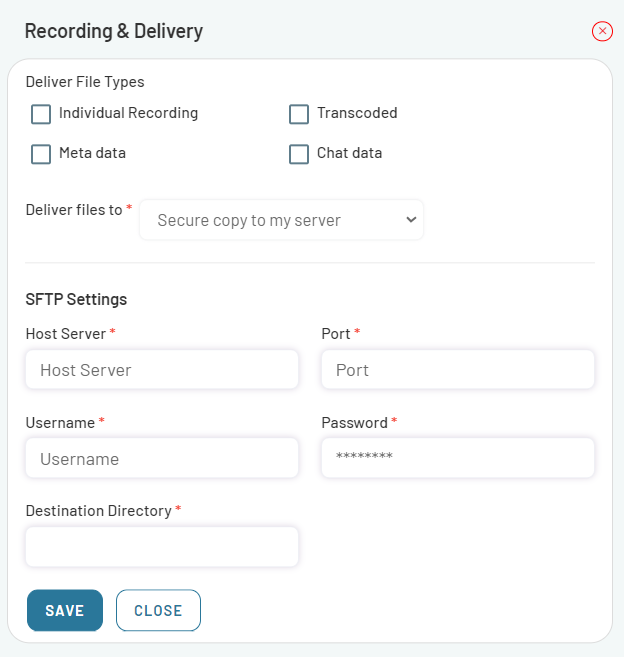
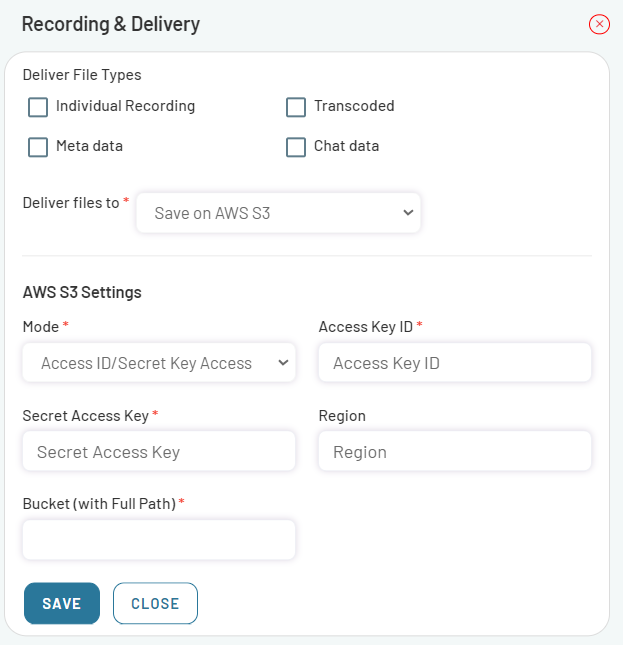
Deliver File Types
-
Select the file type(s) you want to include in the delivery of recorded content. The available options in this case are:
- Individual Recording: Deliver each recording as a separate file.
- Live Recording: Deliver recorded content from live sessions.
- Transcoded: Deliver the content in a transcoded format.
- Meta data: Include metadata associated with the recorded content.
- Chat data: Include the chat data from the recorded sessions.

Deliver files to
-
Select the destination where the recorded file(s) will be delivered. Available destination options are:
- FTP to my server
- Secure a copy to my server
- Save on AWS S3
- Save on Google Drive
- Save on Microsoft Azure
Transfer to FTP/SFTP Host
-
Select FTP to my server from the Deliver files to drop-down list.
-
The FTP to my server section will display on the recording & delivery page.
-
Specify the details required for file transfer.This includes:
- FTP server details: Enter the hostname or IP address of the FTP server where you want to transfer the files.
- Username: Specify the username associated with your FTP server account.
- Password: Enter the password for the provided username.
- Port (optional): If required, provide the port number for the FTP connection. If left blank, it will typically use the standard FTP port.
-
Click on SAVE to submit the specified details.
The files will be transferred to the specified FTP server.
Transfer to using SCP
-
Select Secure copy to my server from the Deliver files to drop-down list.
-
The SFTP Settings section will display on the recording & delivery page.
-
Specify the details required for file transfer.
-
Fill in the form as needed and submit it by clicking on SAVE button.
Transfer to AWS S3
-
Select Save on AWS S3 from the Deliver files to drop-down list.
-
The AWS S3 Settings section will display on the recording & delivery page.
-
Specify the details required for file transfer.
-
Fill in the form as needed and submit it by clicking on SAVE button.
Transfer to Google Drive
-
Select Save on Google drive from the Deliver files to drop-down list.
-
The Google drive Settings section will display on the recording & delivery page.
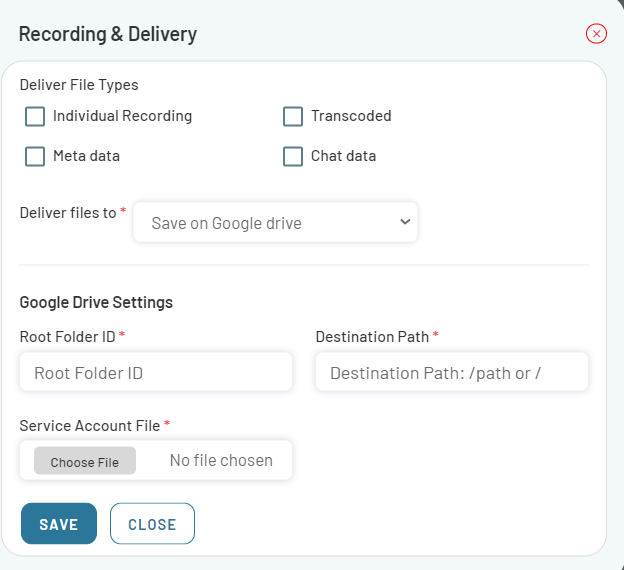
-
Specify the details required for file transfer.
-
Fill in the form as needed and submit it by clicking on SAVE button.
Transfer to Microsoft Azure
-
Select Save on Microsoft Azure from the Deliver files to drop-down list.
-
The Microsoft Azure Settings section will display on the recording & delivery page.
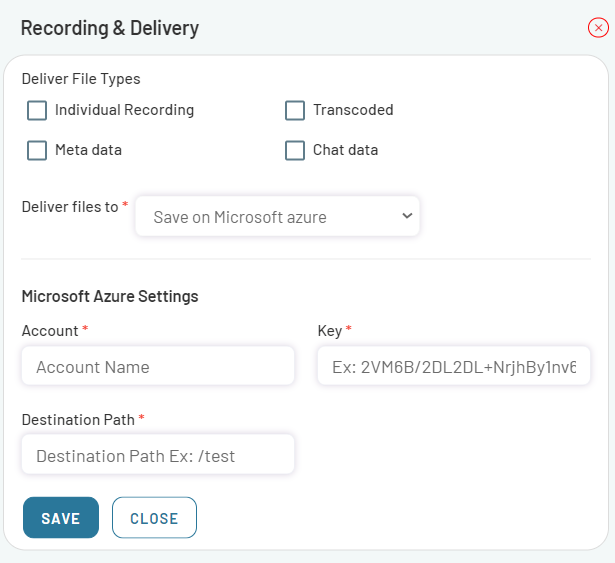
-
Specify the details required for file transfer.
-
Fill in the form as needed and submit it by clicking on SAVE button.
Configure Webhook Settings
Webhooks are an essential feature of the EnableX platform that allows you to receive real-time notifications about specific events. By configuring a webhook URL and selecting the desired events, you can effortlessly stay updated on crucial activities within your application. This chapter will guide you through the process of setting up webhooks and receiving notifications. To set up webhooks and start receiving notifications, follow these steps:
-
Navigate and click the Webhooks settings tab.
-
Specify Webhook URL that will receive the webhook notifications.
Note: Ensure that the URL supports HTTPS and is capable of handling JSON payloads via HTTP POST requests.
Subscribe Events
-
Navigate the Subscribe to the Notifications section.
-
In this section, you will find a list of events that can trigger webhook notifications.
-
Select the Event(s) Name you want to receive notifications for.
-
Toggle the corresponding icon in front of each selected event(s).

Set HTTP Authorization (Optional)
You can enable HTTP authorization if you want to authenticate your users. Authorization headers provide credentials that authenticate a user agent to a server, allowing it access to protected resources. To implement secured access in your webhook, EnableX supports HTTP Basic Authentication.
-
If your application requires HTTP authorization to receive webhook notifications, follow these additional steps.
-
Enable HTTP Authorization option.
-
Enter the Username and Password associated with your application's HTTP authorization.
-
-
Once you have specified the webhook URL and selected the desired event(s), click on SAVE button to finalize the webhook configuration.
When working with webhooks in the EnableX platform, it's important to note that the Notification URL is a project-specific setting. This means that each project can have its own unique Notification URL. However, it is possible to use the same Notification URL across multiple projects if you want to receive notifications in a centralized location.
When a webhook event occurs and a notification is sent to the specified Notification URL, the JSON data posted will include the app_id parameter. This parameter carries the identifier of the project from which the event originated. You can utilize this app_id to segregate and differentiate the data received for each project if needed. This allows you to maintain project-specific logic and handle notifications accordingly.
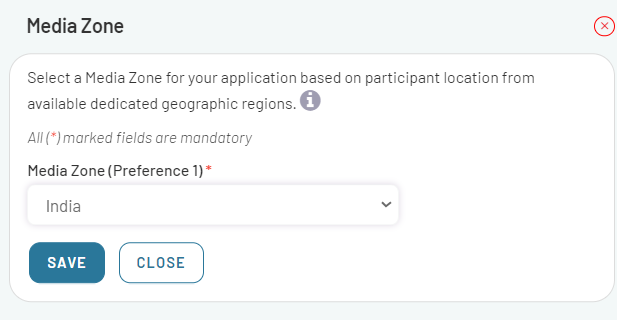
Configure Media Zone Settings
EnableX operates in multiple geographic regions through dedicated media zones. Depending on the geographic location of your participants, you can host your application in a particular media zone. The media and signalling traffic is hosted in specific regional data centers as per your preferred media zone. If you have subscribed to a different media zone, you can select it from the Media Zone (Preference 1) menu.
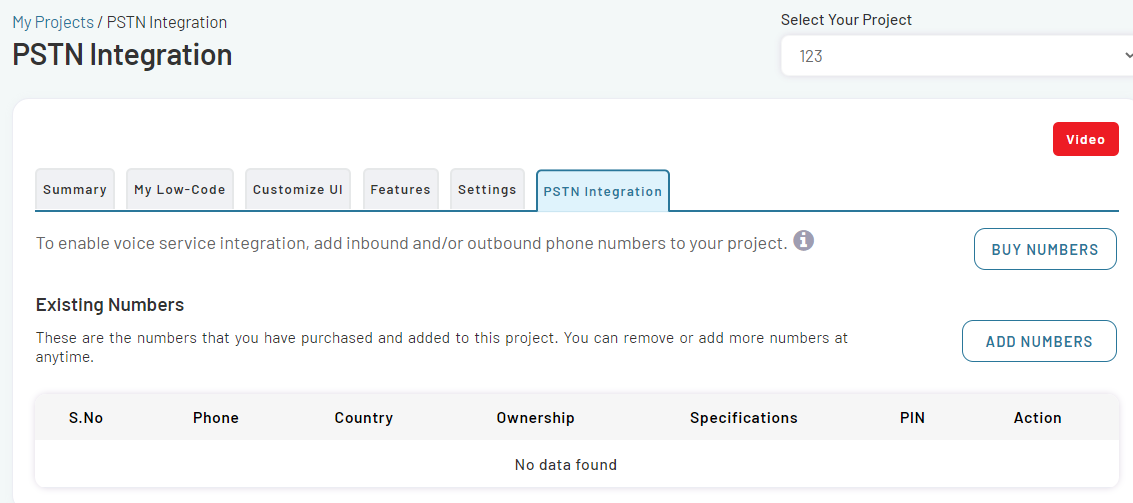
Configuring PSTN Integration Settings
If you want to integrate incoming and outgoing voice service, you need to add inbound and outbound phone numbers to your project. This helps users join the virtual sessions using a phone call, or be invited to the call through dial-out. To add PSTN integration to your project, do the following:
-
Navigate to Video section in the left menu pane and select Dashboard option from the drop-down.
-
Select the project for which you want to configure PSTN voice Integration. This will take you to the Project Summary page.
-
On the Project Summary page, select the PSTN Integration tab.
-
The PSTN Integration form will open, where you can Buy Numbers and Add existing Numbers to the Video conference.
-